Installation (tutorial)
In short, to install and start visone you go to the visone download page, save the latest current version (for example, visone-2.9.2.jar) on your hard disk (for example, on your desktop), and execute the downloaded file (for instance, by double-clicking on it). The visone window opens and visone is ready for use!
You have to read the remainder of this tutorial only if this does not work immediatelly or if you want to install and run one of several extension packages that can be used in connection with visone (otherwise you might leave this tutorial and go to the next).
Installing visone
Installing visone is very simple. You can start it either from you local hard disk or use visone webstart. To download visone and start it from your local hard disk do the following two steps:
- Go to the visone download page and save the latest current version (for example,
visone-2.9.2.jar) on your hard disk (for example, on your desktop). - Execute the downloaded file (for instance, by double-clicking on it). The visone window opens and visone is ready for use! (and you might leave this tutorial and go to the next).
Even simpler is starting the program via visone webstart. To do this go to the visone Website and click on the link webstart in the left upper corner. Tell your browser to execute the file visone.jnlp. (note: visone webstart uses a maximum heap size of 256 MB by default)
Starting visone with more memory
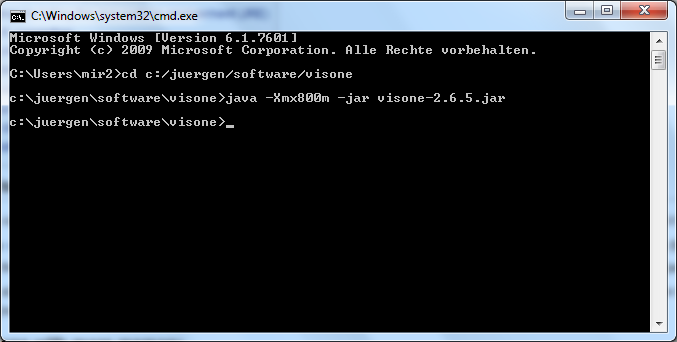
For larger networks, you might have to allocate more memory for the Java Virtual Machine JVM by executing the downloaded file from a command prompt. On computers running Windows you can open a command window by typing cmd in the search field at the bottom of the start menu (or you can search for the executable file cmd.exe, for instance in C:\Windows\system32\cmd.exe - depending on your version and configuration). In the command window (the black window shown below) you first have to navigate with the cd command (change directory) to the directory where the visone JAR file can be found (for instance cd C:/juergen/software/visone; see below).
There you can start visone (with extended memory size) by typing the command
java -Xmx256m -jar visone-2.7.3.jar
The option -Xmx256m increases the java heap size to 256 MB, -Xmx800m increases the java heap size to 800 MB, -Xmx1g increases the java heap size to 1 GB, and so on (default size is 128 MB).
Troubleshooting: installing the java runtime environment (JRE)
If the visone window does not open and if you get a message similar to "cannot open file: visone-2.9.2.jar", then it is most likely that the Java Runtime Environment (JRE) is not installed on your computer. In this case do the following steps.
- Go to the Java download page [1].
- Search in the list for Java SE Runtime Environment (JRE) (version 6 or higher) and click on download. Follow the instructions.
- Once you have installed the JRE, do as described in the previous section.
If your computer extracts the JAR file upon double-clicking it, then the wrong software seems to be associated with JAR files. On Windows computers you can righ-click the JAR file, select Open with ..., and then select Java(TM) Platform SE binary (or similar). You can also permanently associate the Java software with JAR files by changing the file properties (again do a right-click on the JAR file, select Properties, select the tab General, and click on the button Change in the line where it says Open with XYZ; again select Java).
Installing the R connection
visone offers an interface to the R environment for statistical computing. You need to install the R connection only if you want to use this interface; for all other uses of visone there is no need to do so.
Rserve installation
We assume that you have an R installation running (install the latest version fitting to your system from the link). For a connection between visone and R we additionally need the RServe packages. You can install this package directly from R:
- start an R console (the R GUI under windows, or type "R" on a terminal in Linux/MacOS)
- in the R console run the command:
   install.packages("Rserve", dependencies=T)
   install.packages("xtable", dependencies=T)
- make sure the installation completed successfully
- you can close R (i.e. by running the command
q(), no need to save anything)
On Windows, it is often necessary to copy the file Rserve.exe from the library folder Rserve to the folder that contains file R.dll. If you use the standard settings during your R installation, you should find the file Rserve.exe in
C:\Users\'yourName'\Documents\Rnwin-library\'R-version-number'\Rserve
and the file R.dll in
C:\Program Files\R\R-'version-number'\bin\i386
So, you should copy Rserve.exe from the former directory to the latter.
Now, your R should be ready for visone and you just have to tell visone where it can find it.
The following subsections explain how to set the R connection properties in the options dialog (menu file, options).
basic connection settings in visone
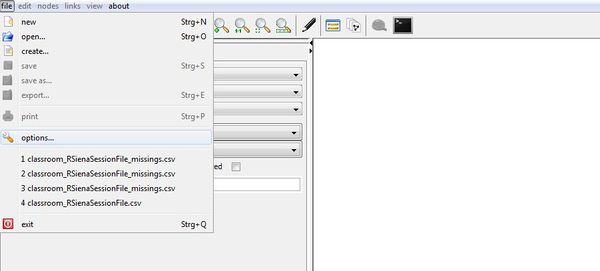
To connect with R you have to tell visone where your R is installed. You do this in the in the options dialog which you open by choosing file and options... in the menu.
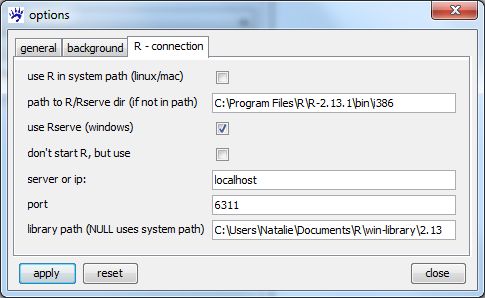
In the options dialog you choose tab 'R-connection:
If you are working on a Windows system:
- check box "use Rserve" and paste the path to file "Rserve.exe" (normally
C:\Program Files\R\R-2.13.1\bin\i386, see) in "path to R/Rserve dir" - paste the path where your libraries are installed or should be installed (normally
C:\Users\'yourName'\Documents\Rnwin-library\2.13\Rserve) in "library path"
If you are working on a Linux or MacOS, try not to touch anything. If this does not work for you, configure the following options:
- "use R in system path" - use this option if you have a regular R installation on a Linux or MacOS and the binary is in the path
- "path to R/Rserve dir" - if the first option does not work for you (or you want to start a specific R installation) give the path to the executable here (the directory where the executable "R" (all other) file is located)
library configuration
In some cases R has a problem to find its libraries when started from visone. If you experience problems with library installation, i.e. visone connects, but cannot install libraries or send graphs to R, you can configure the location of your libraries here. This is also an option to have a unique place where all the visone installed R libraries will reside. The option is
- "library path" - paste the path where your libraries are installed or should be installed. Use "NULL" for default (system) path.
start your own R
If you're planning to start R on a remote machine or the other options do not work for you, you can run your own instance of R and have visone connect to it:
- "don't start R, but use" - check this if you would like visone to use an R instance started by you
- "server or ip" - give the name of the server or its ip adress
- "port" - the port visone should connect to
if it still doesn't work
In case you have trouble connecting, you can always start your own R-session. To do this, start the usual R, make sure your completed the RServe installation (see above) and run:
  library(Rserve)
  Rserve()
Starting visone on a computer prepared in this way should give you a proper connection to R.
You can learn how to use R in connection with visone in the general tutorial on visone's R console and in the tutorial on using RSiena from within visone; for the latter usage scenario there is an additional short guide on how to use RSiena from within visone.
KNIME installation
Get a copy of Knime from http://www.knime.org and install it.
Now we need to install the "bison-plugin", go to "Help->Install new software" add "http://tech.knime.org/update/bison" as update site and install the BisoNet plugin, especially "visone Integration" is needed.
After this installation you should find a number of new nodes in the "BisoNet"-category which can be used to create, manipulate or analyze networks. In the subcategory "visone" you find the "Input Connector"-Node which is used to receive networks from visone and the "Output-Connector"-Node, used to send networks to visone.
For a test, keep your Knime running, add an "Input Connector"-Node and start visone. See further details in the page Knime menu.


