Attribute manager: Difference between revisions
No edit summary |
|||
| (25 intermediate revisions by 4 users not shown) | |||
| Line 1: | Line 1: | ||
The attribute manager is started by clicking on its icon [[File:Attribute_manager.png|link=attribute_manager]] in visone's toolbar. | An [[Attribute|attribute]] is a function that maps elements of the network (such as nodes or links) to values. An attribute has a name, domain (specifying the type of network elements it is defined on), type (specifying the possible values, such as ''text'', ''integer'', ''boolean'', etc), and possibly a default value and a description. Attributes attach information to network elements, such as the name or age or geographic coordinates of a node or the width or capacity or encoded type of relation of a link. Attributes also encode the results of a [[Analysis_tab|network analysis algorithm]] such as node centrality of cluster membership. The '''attribute manager''' provides functionality related to the creation, configuration, and automatical modification of attributes, as well as methods for selecting and filtering nodes and links based on their attributes. The attribute manager is started by clicking on its icon [[File:Attribute_manager.png|link=attribute_manager]] in visone's toolbar. | ||
== | == What to do with which attributes? == | ||
The four buttons in the top row are used to select the type of elements whose attributes one wants to manage, namely | |||
* '''node''' attributes | |||
* '''link''' attributes | |||
* '''dyad''' attributes | |||
* '''network''' attributes | |||
[[File:Attribute_manager2.png]] | [[File:Attribute_manager2.png]] | ||
The | The six buttons on the left-hand side are used to specify what kind of management one is looking for, namely | ||
* node attributes | * '''show & edit''' displays the values of all (node, link, ...) attributes and allows to modify them manually | ||
* | * '''select''' allows to select all elements taking specific values for a single specified attribute | ||
* | * '''configure''' to add and delete attributes; change their names, range of values, description, or default values | ||
* | * '''manipulate''' apply transformation functions to one or several attributes | ||
* '''filter''' specify potentially complex ways to select elemens (much more powerful than '''select''') | |||
* '''import & export''' read from and write to CSV files | |||
These categories of attribute management are further explained below. | |||
In general, whenever you have specified an operation you have to click on the '''apply''' button to execute it. Depending on the operation you can choose to apply it only to the current network or to several networks at once, you can specify whether the operation should be only applied to the currently selected elements and whether the operation result should modify the network directly (choose ''result in'' '''same tab''') or whether visone should first create a copy of the network and apply the operation to this copy ('''new tab'''). | |||
== | == Show & edit == | ||
The '''Show & edit''' category can be used to explore the values that the nodes/links (or the selected nodes/links, if there are selected nodes/links) assume on all attributes. | |||
[[File:Attribute_manager_show_n_edit.png]] | |||
You can also modify the values if the '''allow editing''' box is checked and you can specify whether to display only a subset of attributes (use check marks at the top). | |||
Note, that attribute values are typically not added manually (which would be tiresome). It is more usual that attributes are [[#Import_&_export|imported]] from files or computed by a [[analysis_tab|network analysis algorithm]]. | |||
== Select == | |||
The category '''select''' allows you to select all elements that have a specified value in a given attribute. | |||
[[File:Attribute_manager_select.png]] | |||
The drop-down menu right of ''attribute'' is used to choose the attribute that should define the selection. The table below then shows all different values of that attribute and the number of elements that have these values. Clicking on one or several (keep the Control key pressed) rows in this table selects all these elements. | |||
Note that the category [[#Filter|filter]] offers much more powerful ways to select elements dependent on attributes. | |||
== | == Configure == | ||
The '''configure''' category allows you to create or delete attribute functions, to change meta information (such as name, type, default value, and description) and to select one attribute as node / link label. | |||
[[File:Attribute_manager_configure.png]] | |||
To create a new attribute click on the '''create attribute''' button (which adds a new row to the table above) and specify the attributes meta information: | |||
* check mark '''label''': the check mark in the left column defines the attribute that is displayed as label (for nodes/links) | |||
* '''name''': enables the (re-)definition of attribute names; choose a short but intuitive name here that indicates the semantics of the attribute | |||
* '''type''': defines the type that is the range of values of the attribute; this can be (text, binary, integer, decimal, text list, integer list, decimal list) | |||
* '''default''': can be used to define a default value for those elements that have no value assigned | |||
* '''description''': a human-readable and potentially long description of what is encoded by the attribute | |||
When all this information is specified, you have to click on the '''apply''' button to actually create the attribute. | |||
You can also ''' | You can also change the meta information for attributes that are already defined for the network. Attributes can be deleted by checking the box '''delete''' in the rightmost column. | ||
''' | All these changes can be done only for the current network (choose '''this network''' in the drop-down menu) or for all '''open networks'''. | ||
'''Note''' that whenever some attribute is scheduled for creation or deletion or some of its meta information has been changed, you have to click on the '''apply''' button at the bottom of the attribute manager to execute these changes. | |||
Finally, '''manipulate values''' provides means to | == Manipulate == | ||
The '''manipulate''' category provides powerful means to apply automatic transformations to one or several attributes. One example is provided in the [[Managing_attributes_(tutorial)|tutorial on ''advanced attribute management'']]. | |||
[[File:Attribute_manager_manipulate.png]] | |||
In the first drop-down menu you specify the type of manipulation | |||
You can '''copy''' an existing attribute and all its values to an already existing attribute (if you want to overwrite this) or provide a new name of the ''result attribute'' (if you just want to create a copy that you might modify later without loosing the original information). | |||
You can '''rank''' the elements with respect to any numerical attribute that is already in the network. | |||
'''Merge to list''' enables you to concatenate the values of two or more existing attriubtes (pressing Crtl key to add single ones or holding shift key to select a number of successive ones) into a comma separated list of these values. | |||
Conversely, there are a number of possibilities to '''convert list values''', namely calculating their '''maximum''', '''minimum''', '''average''', or '''sum''', count the number of elements, number of distinct elements, or '''concatenate''' them. | |||
Finally, '''manipulate values''' provides means to apply certain functions to the values of one or several existing attributes, among others | |||
* '''invert''' (note, that a zero attribute value will result in a N/A entry in the result attribute!) | * '''invert''' (note, that a zero attribute value will result in a N/A entry in the result attribute!) | ||
* '''reverse''' | * '''reverse''' | ||
* '''add''' a specified ''offset'' | * '''add''' a specified ''offset'' | ||
* '''add attributes''' | |||
* '''scale''' with a specified ''scalar'' | * '''scale''' with a specified ''scalar'' | ||
* '''multiply attributes''' | |||
* '''normalize''' (i.e. each value is divided by the maximum values) | * '''normalize''' (i.e. each value is divided by the maximum values) | ||
* '''standardize''' (i.e. each value is divided by the sum of all values) | * '''standardize''' (i.e. each value is divided by the sum of all values) | ||
* '''round''' to specified ''fraction digits'' | * '''round''' to specified ''fraction digits'' | ||
* '''round up''' to specified ''fraction digits'' | * '''round up''' to specified ''fraction digits'' | ||
the values of | * apply square (roots) or logarithms, etc. | ||
While the attribute manager, thus, offers only a limited set of functions to transform attributes, general transformations can be specified and executed via visone's [[R_console_tab|R interface]]; this is illustrated in the [[R_console_(tutorial)|tutorial on ''using visone's R console'']]. | |||
== Filter == | |||
Category '''filter''' can be used to select elements dependent on attribute values, graphical values, incidence to selected links, adjacency to selected nodes, or combinations thereof. It is much more powerful than attribute management category '''select'''. | |||
[[File:Attribute_manager_filter.png]] | |||
Each row in the central area defines one condition for the filter; an element gets only selected if it satisfies all conditions. The radio buttons at the bottom specify how the selection defined by the filter is combined with the current selection (if any): | |||
*'''replace''' turns the selection defined by the filter into the current one (irrespective the previous selection) | |||
*'''add''' builds the union of the filter's selection with the current one | |||
*'''remove''' deselects those elements that match the filter from the current selection | |||
*'''intersect''' selects only those elements that are in both the current selection and in the filter's selection | |||
There are several possibilities to specify a condition (one row of the filter): | |||
*'''attribute''' allows to select all elements that assume values in specified ranges (the choices are different for numerical attributes than for text attributes) | |||
*'''position''' constraints the x-/y-positions of selected nodes | |||
*'''color''', '''size''', and '''shape''' can further specify the graphics of nodes or links | |||
*'''incidence''' allows to select the nodes that have incident links that are already selected | |||
*'''adjacency''' requires that neighbors of the nodes have to be currently selected | |||
== Import & export == | |||
Attributes can be imported from and exported to files in ''comma-separated value tables''; this is illustrated in the [[Data_input_(tutorial)|data input tutorial]]. When importing attributes from a .csv file you have to specify how the data shall be joined. That is, the .csv file should contain a column that is named according to the '''join by''' attribute of the network. It is also possible to import an additional link attribute via a .csv matrix (nodes IDs in the matrix have to be the same as in the network). | |||
[[File:Attribute_manager_import.png]] | |||
When exporting attributes you can specify how the data shall be sorted, using the attribute selected for '''sort by'''. | When exporting attributes you can specify how the data shall be sorted, using the attribute selected for '''sort by'''. | ||
If you are working with more than one network tabs, you can also export one specified attribute of all open networks as a table. | If you are working with more than one network tabs, you can also export one specified attribute of all open networks as a table. | ||
Latest revision as of 15:10, 9 May 2015
An attribute is a function that maps elements of the network (such as nodes or links) to values. An attribute has a name, domain (specifying the type of network elements it is defined on), type (specifying the possible values, such as text, integer, boolean, etc), and possibly a default value and a description. Attributes attach information to network elements, such as the name or age or geographic coordinates of a node or the width or capacity or encoded type of relation of a link. Attributes also encode the results of a network analysis algorithm such as node centrality of cluster membership. The attribute manager provides functionality related to the creation, configuration, and automatical modification of attributes, as well as methods for selecting and filtering nodes and links based on their attributes. The attribute manager is started by clicking on its icon ![]() in visone's toolbar.
in visone's toolbar.
What to do with which attributes?
The four buttons in the top row are used to select the type of elements whose attributes one wants to manage, namely
- node attributes
- link attributes
- dyad attributes
- network attributes
The six buttons on the left-hand side are used to specify what kind of management one is looking for, namely
- show & edit displays the values of all (node, link, ...) attributes and allows to modify them manually
- select allows to select all elements taking specific values for a single specified attribute
- configure to add and delete attributes; change their names, range of values, description, or default values
- manipulate apply transformation functions to one or several attributes
- filter specify potentially complex ways to select elemens (much more powerful than select)
- import & export read from and write to CSV files
These categories of attribute management are further explained below.
In general, whenever you have specified an operation you have to click on the apply button to execute it. Depending on the operation you can choose to apply it only to the current network or to several networks at once, you can specify whether the operation should be only applied to the currently selected elements and whether the operation result should modify the network directly (choose result in same tab) or whether visone should first create a copy of the network and apply the operation to this copy (new tab).
Show & edit
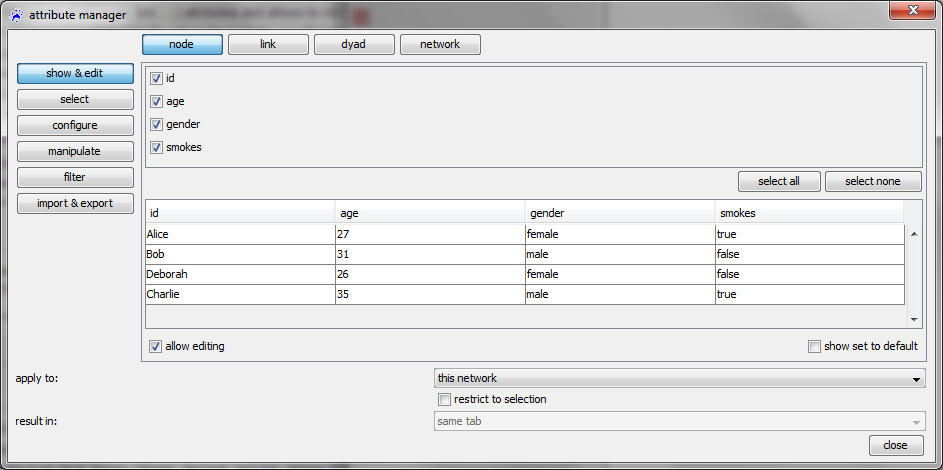
The Show & edit category can be used to explore the values that the nodes/links (or the selected nodes/links, if there are selected nodes/links) assume on all attributes.
You can also modify the values if the allow editing box is checked and you can specify whether to display only a subset of attributes (use check marks at the top).
Note, that attribute values are typically not added manually (which would be tiresome). It is more usual that attributes are imported from files or computed by a network analysis algorithm.
Select
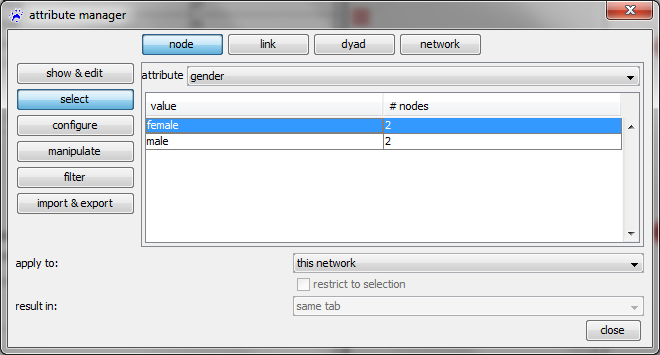
The category select allows you to select all elements that have a specified value in a given attribute.
The drop-down menu right of attribute is used to choose the attribute that should define the selection. The table below then shows all different values of that attribute and the number of elements that have these values. Clicking on one or several (keep the Control key pressed) rows in this table selects all these elements.
Note that the category filter offers much more powerful ways to select elements dependent on attributes.
Configure
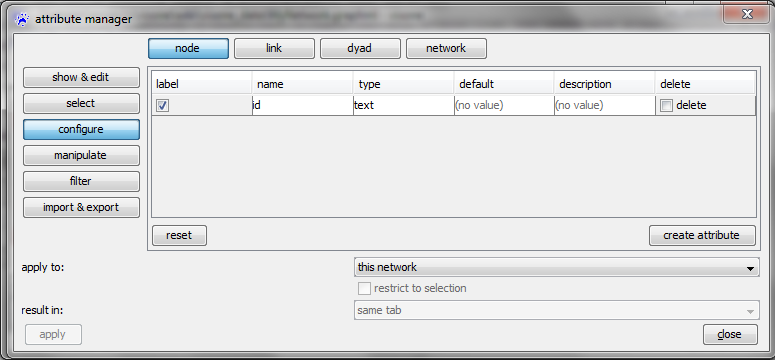
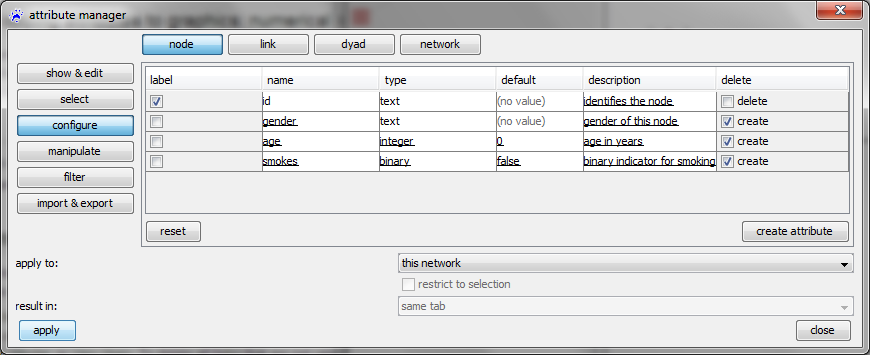
The configure category allows you to create or delete attribute functions, to change meta information (such as name, type, default value, and description) and to select one attribute as node / link label.
To create a new attribute click on the create attribute button (which adds a new row to the table above) and specify the attributes meta information:
- check mark label: the check mark in the left column defines the attribute that is displayed as label (for nodes/links)
- name: enables the (re-)definition of attribute names; choose a short but intuitive name here that indicates the semantics of the attribute
- type: defines the type that is the range of values of the attribute; this can be (text, binary, integer, decimal, text list, integer list, decimal list)
- default: can be used to define a default value for those elements that have no value assigned
- description: a human-readable and potentially long description of what is encoded by the attribute
When all this information is specified, you have to click on the apply button to actually create the attribute.
You can also change the meta information for attributes that are already defined for the network. Attributes can be deleted by checking the box delete in the rightmost column.
All these changes can be done only for the current network (choose this network in the drop-down menu) or for all open networks.
Note that whenever some attribute is scheduled for creation or deletion or some of its meta information has been changed, you have to click on the apply button at the bottom of the attribute manager to execute these changes.
Manipulate
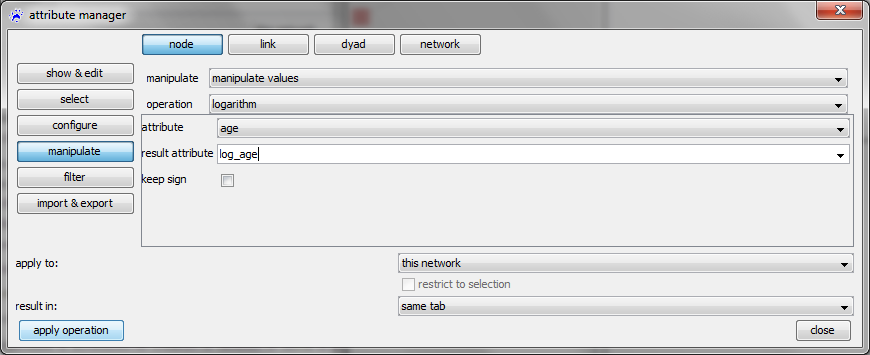
The manipulate category provides powerful means to apply automatic transformations to one or several attributes. One example is provided in the tutorial on advanced attribute management.
In the first drop-down menu you specify the type of manipulation
You can copy an existing attribute and all its values to an already existing attribute (if you want to overwrite this) or provide a new name of the result attribute (if you just want to create a copy that you might modify later without loosing the original information).
You can rank the elements with respect to any numerical attribute that is already in the network.
Merge to list enables you to concatenate the values of two or more existing attriubtes (pressing Crtl key to add single ones or holding shift key to select a number of successive ones) into a comma separated list of these values.
Conversely, there are a number of possibilities to convert list values, namely calculating their maximum, minimum, average, or sum, count the number of elements, number of distinct elements, or concatenate them.
Finally, manipulate values provides means to apply certain functions to the values of one or several existing attributes, among others
- invert (note, that a zero attribute value will result in a N/A entry in the result attribute!)
- reverse
- add a specified offset
- add attributes
- scale with a specified scalar
- multiply attributes
- normalize (i.e. each value is divided by the maximum values)
- standardize (i.e. each value is divided by the sum of all values)
- round to specified fraction digits
- round up to specified fraction digits
- apply square (roots) or logarithms, etc.
While the attribute manager, thus, offers only a limited set of functions to transform attributes, general transformations can be specified and executed via visone's R interface; this is illustrated in the tutorial on using visone's R console.
Filter
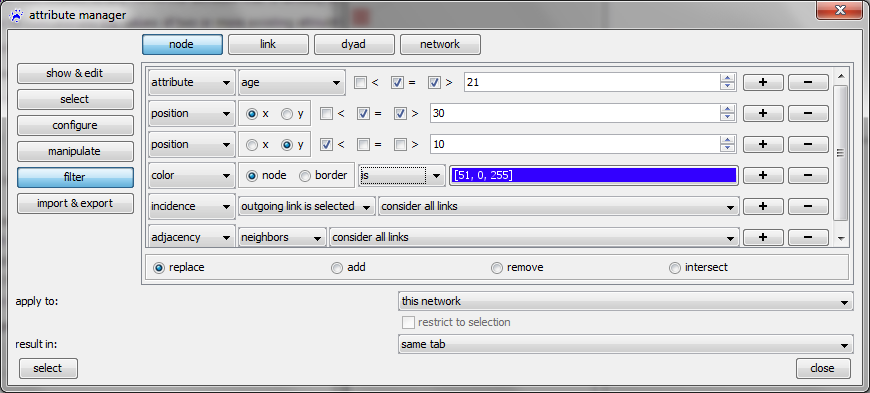
Category filter can be used to select elements dependent on attribute values, graphical values, incidence to selected links, adjacency to selected nodes, or combinations thereof. It is much more powerful than attribute management category select.
Each row in the central area defines one condition for the filter; an element gets only selected if it satisfies all conditions. The radio buttons at the bottom specify how the selection defined by the filter is combined with the current selection (if any):
- replace turns the selection defined by the filter into the current one (irrespective the previous selection)
- add builds the union of the filter's selection with the current one
- remove deselects those elements that match the filter from the current selection
- intersect selects only those elements that are in both the current selection and in the filter's selection
There are several possibilities to specify a condition (one row of the filter):
- attribute allows to select all elements that assume values in specified ranges (the choices are different for numerical attributes than for text attributes)
- position constraints the x-/y-positions of selected nodes
- color, size, and shape can further specify the graphics of nodes or links
- incidence allows to select the nodes that have incident links that are already selected
- adjacency requires that neighbors of the nodes have to be currently selected
Import & export
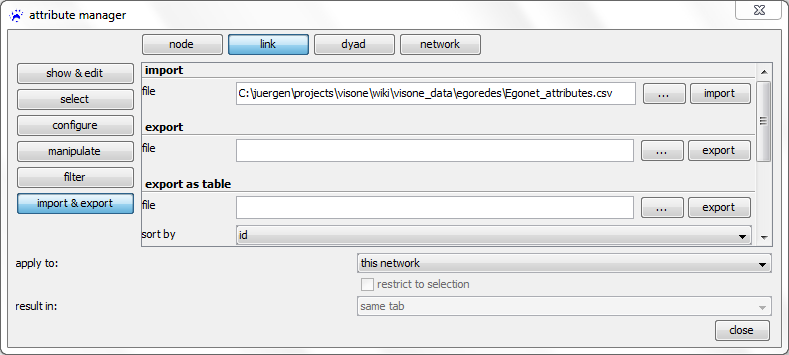
Attributes can be imported from and exported to files in comma-separated value tables; this is illustrated in the data input tutorial. When importing attributes from a .csv file you have to specify how the data shall be joined. That is, the .csv file should contain a column that is named according to the join by attribute of the network. It is also possible to import an additional link attribute via a .csv matrix (nodes IDs in the matrix have to be the same as in the network).
When exporting attributes you can specify how the data shall be sorted, using the attribute selected for sort by.
If you are working with more than one network tabs, you can also export one specified attribute of all open networks as a table.
